Introduction
Widgets are an important part of home and can be powerful tools to share information with users. From personal information such as tasks and teams, to organisation wide information via colleagues and company calendar and and last but not least knowledge sharing in alerts and tips of the day. Widgets aggregate data from SharePoint, which can be accessed through clickable links and tiles. As home refreshes every 5 minutes, updates are quickly visible to all.
Go to home configuration in the admin panel to enable and order widgets. This article is about the configuration of widgets, read more about organising widgets here.
In this article we will explain the menu options for widgets, generally and per widget. Feel free to use the menu in the right to go straight to the advised choices for the widget you wish to configure. The widget settings can be configured in the admin panel. In the image below you can find an all the possible settings of the widgets explained.

As you may notice in the image:
- points 1 to 4 are 'general settings' for the widget.
- you can choose to show one, or 2 rows of information, points 5 to 7 are the options for these rows explained.
- you can choose to have these settings the same or differently per row depending on the widget.
- In some widgets you may additionally notice List name and location; if they are needed, these will be given. As is the case for the alerts widget: List name (alerts) and location (https://{tenantname}.sharepoint.com/sites/{sitename}) are given.
Currently there are six configurable widgets, for which most settings are 'pre-set'. Shortly it will be possible for organisations to create their own widgets that will show information based on self connected data sets. We have created the admin panel with this in mind. Below an explanation per widget.
Alerts widget
With the alerts widget the organisation can be informed instantly of instant and/or important situations. It's the first thing a user sees on home when they log into the digital workspace. This paragraph is about configuring the alerts widget, follow this link for more information on creating and posting alerts.

These are the advised settings for alerts in the admin panel:
- button url refers to the link that will open when you click on the alert icon. The standard link is https://{tenantname}.sharepoint.com/sites/{sitename}/Lists/Alerts.
- choose to open this url in an iframe in the same page by setting the button to on. If the button is turned off this link will open in a new tab.
- we advice against 'cache data for this widget', so leave this off. Otherwise there is a chance users see outdated information. Even though it is refreshed within 5 minutes, it may give the wrong idea.
- List name (alerts) and location (https://{tenantname}.sharepoint.com/sites/{sitename}) are given.
- Choose to display one or 2 rows of information.
- Choose what icon to display for that row on home.
- We advise to turn use title on to display a title.
- Turn on use callout so users can easily digest short alerts, by reading the information in the callout. Should the article be longer, they can click read more to go the full article.
- Turn off use as link.
Colleagues widget
The colleagues widget is a great widget to inform users about their colleagues. It can shows the amount of new colleagues as well as who are celebrating a birthday. To make the widget fully functional the employees file in the med folder needs to be updated with organisation specific information. Read more about this in using the colleagues widget.

These are the advised settings for Colleagues in the admin panel:
- button url is given.
- turn off open button url in iframe.
- we advice against 'cache data for this widget', so leave this off. Otherwise there is a chance users see outdated information such as yesteday's birthdays and/or miss today's birthdays.
- Choose to display either one or 2 rows of information.
- Choose what icon to display for that row on home (currently people and birthday cake).
- We advise to turn show count for both rows:
- The first row will show the amount of people that have recently joined the organisation.
- The second row will show a name of the birthday boy/girl or the amount of people celebrating their birthdays, in which case tooltips will show the names of the birthday people when hoovering over the row.
- Turn of use callout as it will not show additional information and only lead to confusion.
- Turn off use as link.
Tasks widget
The tasks widget shows an overview of your current open SharePoint tasks. In due time this will be expanded with outlook- and planner tasks. Here the focus is on the task widget settings, read this article to learn more about the tasks widget.

These are the advised settings for the tasks widget in the admin panel:
- Button url is preset and will open a task overview.
- Choose to open this url in an iframe in the same page by setting the button to on. In the example the button is turned off, so this link will open in a new tab.
- Per widget you can choose to use cached data for this widget at start, or always get 'fresh data'. Here it is set to cache.
- List name and location are given not applicable for these widgets.
- Choose to display 2 rows:
- one to show count, which will show the total amount of open tasks.
- one to use title, which will show the task with the earliest deadline (that should have been completed 1st)
- Choose what icon to display per row, now they are set to task and pin.
- Turn off use callout.
- Turn on use as link so users can click on the link and go to the respective task.
Teams widget
The teams widget shows an overview of all the teams and groups a user is assigned to. The widget shows a count of all groups, and highlights the group that has had the most recent activity.
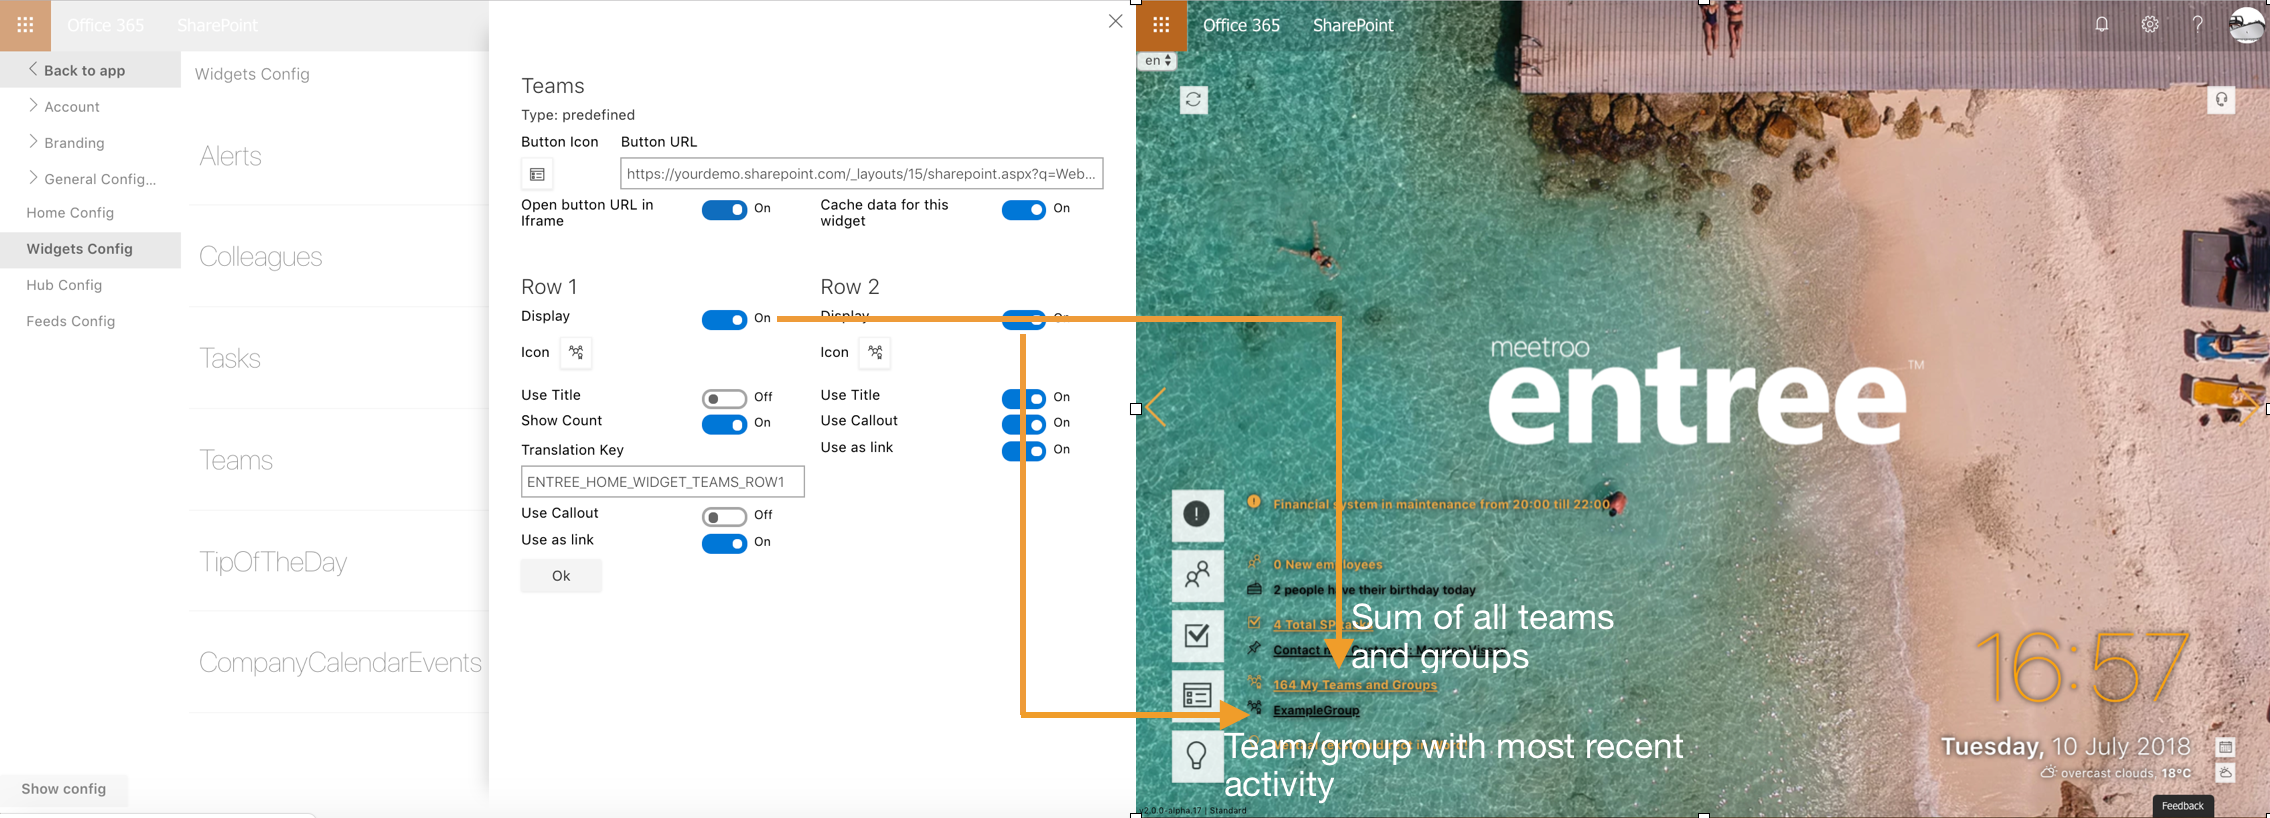
These ar the advised settings for the teams widget in the admin panel:
- Button url is set and leads to an overview of all teams/groups.
- Open url in iframe is optional. If the button is turned off this link will open in a new tab, otherwise it opens in the same window.
- For this widget you can turn on cache data;
- List name and location are not applicable here.
- Choose to display both rows:
- set row 1 to show count, which will then show a sum of all teams/groups;
- set row 2 to use titel, which will show the group/team that has experienced activity the most recently.
- Choose what icon to display per row, now set to group.
- Turn off use callout.
- Turn on use as link for both links to go to the accumulated groups/teams list or the team/group with the most recent activities.
Tips widget
Use the tips widget to share little bites of information with your colleagues as a 'tip of the day'. Topics can be as narrow or as broad as you choose. Think of topics related to make better use of office 365 (and the products it offers) or to increase productivity. But it can also be used to share tips for using the new ERP application or to learn about internal processes. Read more about using the tips widget here.
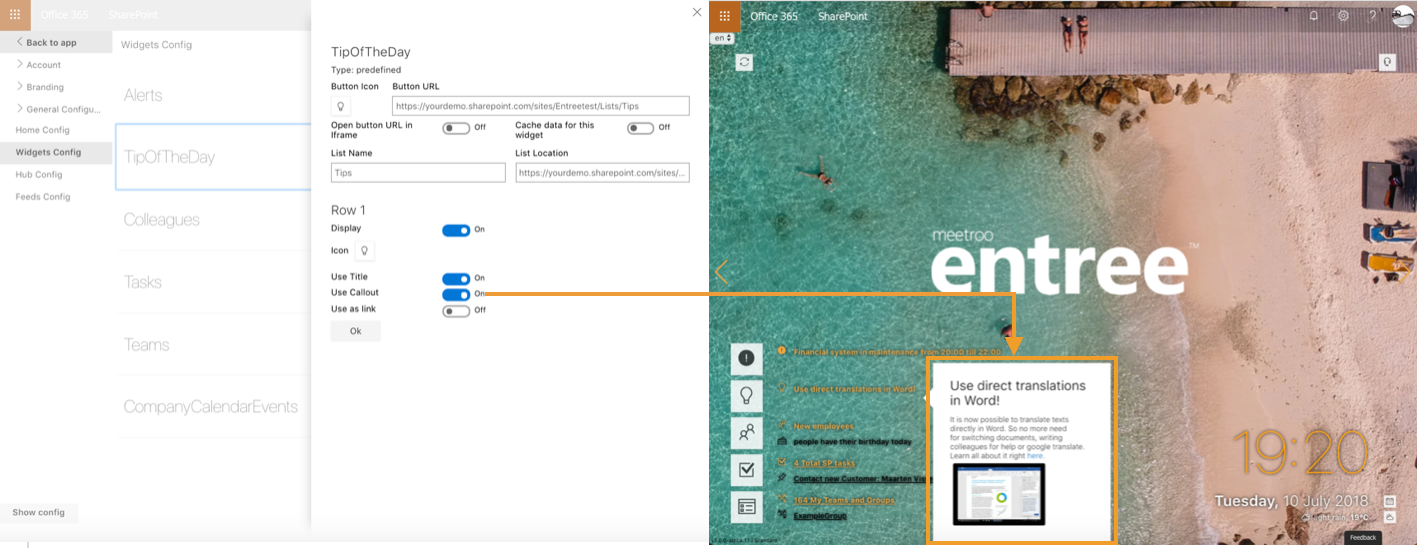
These are the advised settings for the tips widget in the admin panel:
- Button url refers to the list that contains all tips.
- Turn open this url in iframe off.
- Turn use of cache data for this widget off to always see a different tip.
- List name (tips) and location (https://{tenantname}.sharepoint.com/sites/{sitename}) are given.
- This widget only displays 1 row of information.
- Choose what icon to display, now it is set to light bulb.
- Click use title to display the title.
- Turn on use callout to show a small window with the tip when clicking on it. That callout will have a link/read more option that will lead to the full article.
- Turn off use as link.
Company Calendar widget
The company calendar widget can have a nice role in engaging employees, with the happenings of the organisation and its people. Inform them about upcoming team, departmental and company-wide events. Add information so people can engage or participate to the event. Read more about using the company calendar here.
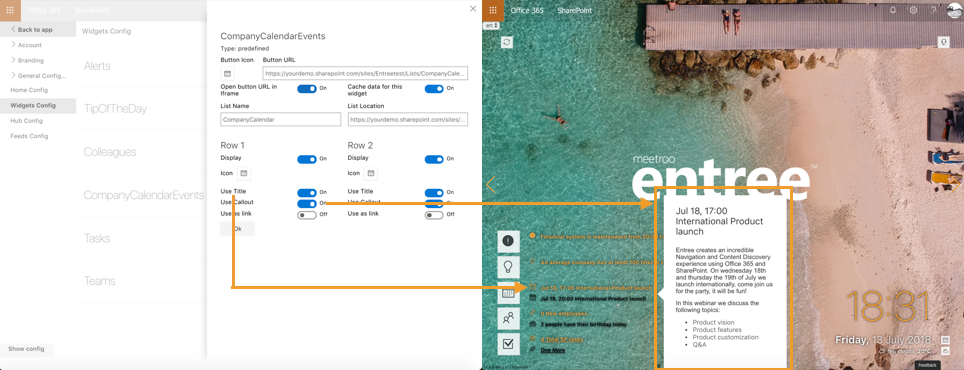
These are the advised settings for the company calendar widget in the admin panel:
- Button url refers to location of the complete company calendar.
- Open url in iframe is optional. If the button is turned off this link will open in a new tab, otherwise it opens in the same window.
- This widget can be set to cached data.
- List name (CompanyCalendar) and location (https://{tenantname}.sharepoint.com/sites/{sitename}) are given.
- Choose display to 2 rows of information.
- Choose icon, now set to calendar.
- Click use title.
- Turn on use callout. The callout will have a read more option that will lead to the full calendar item.
- Turn off use as link.
Was this article helpful?
That’s Great!
Thank you for your feedback
Sorry! We couldn't be helpful
Thank you for your feedback
Feedback sent
We appreciate your effort and will try to fix the article